Sunday, August 28, 2011

Cardboard Truck: Intro

Back in July we went on vacation to Dar and on return trip got stranded in Dodoma with car trouble. It was actually a fabulous place to be stranded, because we have some friends there who graciously housed us and helped us get the truck fixed. Little Man had a blast hanging out with following around their oldest daughter! He also enjoyed seeing some different toys, among them this Little Tikes car.


Seriously, he would sit in this thing for long periods of time. He couldn't even make it roll on his own, but he loved it. Ever since I've had it in my mind to make him a cardboard truck. Months ago I cleaned out the box and even started on some of the details (steering wheel, seat cushion), but then it got put on hold while we enjoyed visits from family. Last week I finally pulled it out again and I'm making some real progress. I'm planning on doing several posts about it, because it would be way too much for just one post. If you're thinking that a little person in your life could really use a cardboard vehicle, stay tuned! 
First up, the seat cushion.

Wednesday, August 24, 2011

Drawstring Bag

A few weeks ago one of our teammates turned six. I decided to whip up a little gift for her. She has two older sisters so I figured she could use a little bag to keep all her personal goodies. It's a pretty simple drawstring bag and I couldn't resist adding a little embroidery. I actually did the whole thing a little backwards and put the bag completely together before doing any of the embroidery. I didn't know if I'd be able to finish it before the party that night, but in the end I was able to do all the embroidery I wanted, it was just a little tricky with the bag already together.


Here are a couple of details of the embroidery.


The cinched top.

I'm not sure how well you can tell in this picture, but to seal the ends of the ribbon I just used a small flame to melt the end. Perhaps everyone already knows this trick. Just light a candle and hold the ribbon close, but not so close it catches fire. Once you've got a nice melted line all the way across the ribbon won't fray. It's a good idea to keep a little water on hand, just in case. I've done this with all sorts of ribbon, though there may be some it wouldn't work on, such as a 100% cotton ribbon. Not sure.

The fabric is wrinkled in the pictures because the power was out so I couldn't iron it. 

Wednesday, August 17, 2011

Crayon Roll

Last week I got it into my head to make a crayon roll. I used some Tanzanian Kitangi for the outside and pockets and canvas for the lining. I decided to size it for the large size crayons since Little Man is still quite little. Here are the materials all lined up, and Little Man anxious to use the scissors!


One night we were watching TV, but I really wanted to do something creative at the same time so I decided to try a little embroidery. I loved it! It's like doodling on fabric and I love to doodle! Here is the outside piece for the crayon roll after being embroidered.


The construction was pretty simple. For the pocket, I pressed the top edge under a couple of times and sewed in place. Then, I pressed the edges of the lining and pocket piece under about a half inch. I sewed the pocket to the lining along the side and bottom edges. Then I stitched lines in to create the pockets. 

Here's what it looked like from the back at that point.

Next, I pressed the edges of the outer piece under about a half inch making it the same size as the lining piece. I sewed the lining and outer pieces together on all four sides. While doing this I inserted a piece of elastic grosgrain ribbon in one side.

Here's the finished product with crayons in place.

 I decided to make it pretty small, only holding 4 crayons, because at 17mos Little Man is much concerned with a variety of colors. Also I wanted it to be easy to use in small spaces like on an airplane, since many, many airplane rides lay in our future. Also, when we are ready to change over to the small crayons we can just stick two per slot.
Here is the whole thing rolled up.


 And here is the real test: Little Man trying it out.

He seemed to like it. I've been keeping it where he can reach it and several times he's brought it to me to open up for him. 

Saturday, August 13, 2011

Growth Chart

I did most of the work for this project a while back, but just got it hanging in Little Man's room last week. 

 I love the idea of marking kids' heights on a door frame, but we aren't living in the house we plan to always live in so I made this growth chart that we can take with us when we leave. The cream colored fabric is a repurposed curtain from the used clothing market in Geita. The rest of the fabric I bought at a fabric store here, except the little blue bird which was a scrap in my collection. All the pieces are backed with interfacing except the tree trunk. I didn't have a big enough piece for it and I kinda like a little bit of frayed edges here and there. Here's a close-up of the bird.


 And a close up of one of the numbers.

 And here's Little Man standing in front of it.

I didn't get a shot of it after I marked his height, but I'm just using some basic fabric markers.

Family Photo Book


Living on the other side of the world from our family means we don’t get to see them too often. (Our parents and one sibling have come for visits, but the bulk of our family won’t ever be able to come.) When we go back for a visit (which might happen sooner than we had expected!) I want Little Man to be familiar with people’s faces so I made him a little family album.
I started this little project in a Scrap-booking class at the East Africa ladies retreat earlier this year, but just recently started getting the photos together for it. It’s made from 3 small brown paper bags folded in half. Strategically placed staples create pockets througout the book which can hold mini-books for more pictures. Here’s a picture of one of the mini-books sticking out of it’s pocket.
This little dude comes out of one of the pockets and folds open into this. It’s a variation of what I’ve always called an origami book.
Another pull out mini-book looks a little more normal, but still tucks away in the pockets.
There’s plenty of room to add more pictures so I’ll have to encourage all the siblings and cousins to keep having babies! I’ve got to get a few more pictures in it before I introduce Little Man to his book, but I’m thinking he’s going to like it!

Tool Belt

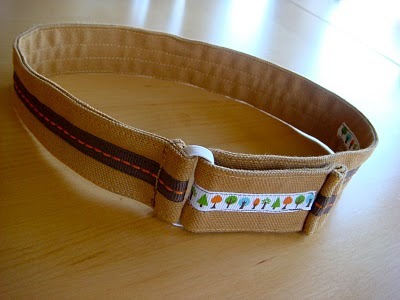
My mother-in-law and sister-in-law have been visiting with us for the last few weeks (which has been great!). Among the goodies they brought to Little Man was a Melissa and Doug tool puzzle. Little Man loved it instantly and has done so much “work” with the hammer that the paint is wearing off. I decided he needed a tool belt to go with it. My inspiration for the structure came fromKatie at So Happy.
Here’s Katie’s way cute belt:
image
See that elastic loop that gives the belt some stretch? Genius.
I  measured Little Man and made the belt so that the smallest size would fit him now. Then, I basically just added some loops and pockets. Ta-Da! Here is the result:
with the puzzle pieces
without the puzzle pieces
Here’s a view of the elastic loop and velcro which holds it together.
the whole thing stretched out
the small pocket has a little measuring tape piece in it.
Here’s a blurry shot of the belt in use.

It Begins


“Can you believe how young she is? And she’s already married? And she knits and paints most of her things. And she collects bottles.” *
A little girl I used to baby-sit once described me this way when introducing me to one of her friends. I don’t know if I appreciate being called young at the time, but at 28 I certainly wouldn’t mind. I don’t actually knit and never have, but I think she got the sentiment right. I like to make stuff.
I recall once in high school seeing a candle holder at someone’s house and doing my best to duplicate it, including using gravel dust to make my own grout. I could have bought one, but it’s so much more fun to see if you can recreate something, and even improve on it.
Sometimes I create for the process, sometimes for the product, sometimes because my husband is short and needs his pants hemmed**. As the mother of a young one I think I’d be tempted to give up the crafting and sewing and creating, but instead Little Man is a source of inspiration. The only toys we can find here are cheap (probably lead painted) junk from China so when I wish I could get something for him I try to make it. If I buy clothes for him they come from the used clothing market (ever wonder what Goodwill does with the stuff that doesn’t sell?). You can’t always find exactly what you’re looking for, so I make it.
I’m also inspired by fabrics I come across, Anna Maria Horner’s blog, the need for curtains and such in my home, and occasionally the desire for a new dress.
* I gave up the bottle collection when I moved to Africa
** My husband would like to clarify that he is not short, rather pants are made for freakishly tall people
*** There wasn’t a third footnote, but you should know that I’m horrible with commas, as, in, I use them, a lot. Recently there was some buzz about a certain sort of comma being ruled invalid. I don’t know what sort they meant, but I’m certain not to give it up and to throw in extras just for spite.